From the FAQ Library:
-a builder's guide-
Introduction
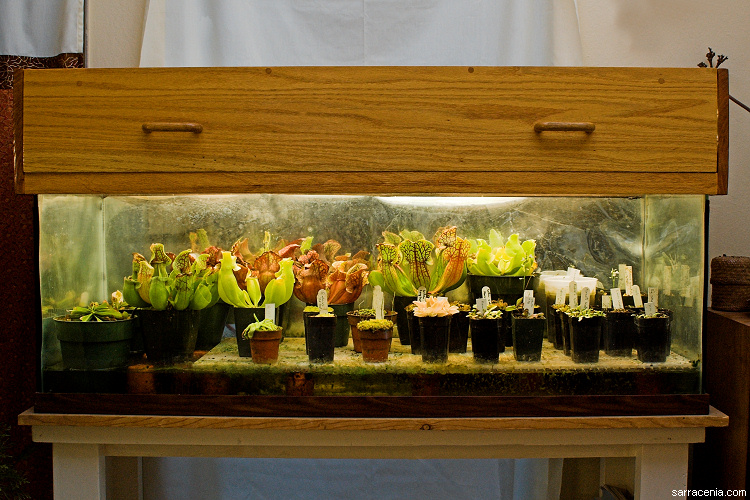
Terrarium
I have been growing carnivorous plants since 1985, in terraria, my back porch,
and in greenhouses. Over the years I have devised 15-20 terrarium arrangements. Most have
been successful but others were dismal failures. Some were ultimately very expensive for the
growing area they provided, others were not. In this
document I describe how to build my terrarium of choice, a
60 gallon tank illuminated by fluorescent lights.
This article details all my construction hints. I wrote this article as I constructed another pair
of terraria, so I know I covered all the details.
The precise dimensions and products described in this article are from my own experiences in
the United States. These instructions will produce an attractive, excellent carnivorous plant terrarium for
relatively little
money. Savings are realized because I suggest using terraria and lighting fixtures of the sizes
most commonly used in home and industry (so the economy of scale means the products are
inexpensive).
In other countries you may need to modify your construction particulars. Since I am writing
this article from the perspective of a U.S. citizen, I will use the ancient and absurd english system
of measurements. I apologize for this!
What can you grow in these terraria? Any kind of carnivorous plant except for tall Sarracenia which really
prefer full sun in a greenhouse. Drosophyllum and a few other plants also do not appreciate
terrarium cultivation.
The terrarium I describe here costs about $300 (USA).
Choosing a terrarium
The first time I tried to grow carnivores (other than fitful childhood programs of plant
torture best forgotten), I bought a 10 gallon terrarium. This was followed by a 30 gallon
terrarium. While these were both moderately successful, they were not well suited for
growing carnivorous plants for three reasons. First, supplying sufficient light was
difficult and expensive: costly specialty fluorescent fixtures were
required. Second, thermal energy from the lights heated these small terraria to
undesirably hot temperatures rapidly. Third, such small terraria provide
only a small growing
space for the effort and cost. The bane of nearly every carnivorous plant enthusiast
is inadequate growing room---small terraria are nearly instantly outgrown.
A fine terrarium is the standard 55 or 60 gallon glass aquarium. Search the phone book
listings for pet stores and aquarium stores. In Tucson, typical 1996 prices were $100-150.
You might discover a
price difference between "terraria" and "aquaria." As far as I can tell, they are probably
equivalent for our purposes. But be cautious! Aquaria specifically marketed under the
name terraria may have less silicone sealant between the glass panes and may
be more likely to
leak. Large aquaria also have some additional reinforcements to withstand pressure
produced by filling them with water. It is probably worth spending the few extra dollars to
buy an aquarium. Do not buy "leakers" unless you can mend the leak.
Make sure the dimensions of the aquarium fit your needs. The
dimensions of the 60 gallon terrarium recommended here are 48" long, 15" wide,
and 17" tall. A 55 gallon terrarium typically measures 48" long by 12" wide by 18" tall.
These are not as good because they have only 80% the growing area and because of
the extra height, plants are slightly farther from the fluorescent fixtures and so have
less light.
Some people are inclined to design and build their own tanks. If you are
such a person, I have little
advice other than you should
make sure the glass is of the appropriate sort, and the sealant
you use is high quality and intended for use beneath the water line.
Optimizing the terrarium
So you have bought or built
a terrarium: excellent. But before it is ready for carnivorous plants it must be
modified slightly. Remember that nearly all carnivorous plants love bright light. It would be very
difficult to illuminate it as brightly as they would most like, but you must strive to do your best.
What you want
to do is minimize light losses out of the terrarium. Light easily escapes out of the front, back, and
sides of an unmodified terrarium.
You decrease light-losses by affixing a reflective surface to the sides
and back of the terrarium.
You have several options on what sort of reflective material to use.
- Aluminum foil. Yes, regular aluminum foil can be taped to the back. This is an inexpensive route but also the least attractive. Make sure the most reflective side is facing towards the plants.
- Mylar wrapping material. Reflective mylar (the metal-coated plastic often made into helium balloons) is good. It can be bought at most stores that sell rolls of wrapping paper. If you look through this material at a light source you can still see the light, so this sheeting is not quite as reflective as I would like.
- Aquarium backing. This is my choice material. It is a mylar sheet several mils thick, much thicker than mylar wrapping material, and is heavily aluminized. It is not only sturdier than mylar wrapping material, it is more reflective. It is more expensive, costing about $2.50 per foot so to cover the back and sides of a 60 gallon terrarium will cost approximately $16--17. There are different kinds of aquarium backing---make sure you see the kind that looks like a very shiny mirror with no frosting or etching marks on it. Sometimes one side is decorative while the back side (normally not intended for use) is precisely the side you desire. You can also find it in large art supply stores.
Cut the backing to size with a razor blade,
then tape it to the glass with electrician's black adhesive tape.
A bonus from minimizing how much light exits the
terrarium is that you decrease unpleasant glare and light which may make the terrarium an
eyesore for your house mates, spouse, or family.
If you are fanatical, you may devise a way to install a detachable
reflective surface to the front of the terrarium so when you are not looking in upon your plants
they have maximum light. I have done this but eventually grew tired of lifting this curtain to see my plants.
The terrarium lid
What is to a lid? A great deal---and this easily overlooked part is very
important. The lid will be a barrier between you and the plants. You want the barrier
to be stable yet easily removed so you can play with your plants when you want.
Designing a good lid requires some thought.
Decide how you will want to gain access
to your plants. Through the top of course, but think beyond that. When you want to fiddle with
your plants do you want to remove the entire cover? Perhaps only half the cover, or only a
quarter? If, as I usually do, you have two or three
fluorescent fixtures resting on the cover, you would
only want to remove the front half of the lid so you can leave one fixture on the tank illuminating
the terrarium while you work. Think about these issues now and as you prepare the lighting,
before you finally commit on how you will arrange the lid. You want it to be as convenient
as possible, otherwise the prospect of opening the terrarium and enjoying your plants is
diminished by some dreadful lid-opening ceremony.
I usually equip a terrarium with a 4-pane lid arranged in four quadrants. These panes
provide complete terrarium coverage. Go to a hardware store with the precise measurements
you need and find glass you like. I suggest double-strength glass. The hardware store will
cut it to your sizes for a small charge.
If you are adventurous, you can cut your own glass. Glass cutting is enjoyable and easy, but
you will have to get instructions elsewhere (maybe I will post more later). There are tricks to
cutting glass, involving temperature ranges at which you can cut glass, phenomena like
"healing" and the effects of wetting the score line.
I don't recommend lexan or plexiglass covers because while these are strong they also scratch
easily, flex under the load of a light fixture, and can look ugly.
Freshly cut glass panes are dangerous and deadly. You can fix this by
bevelling the edges. Mount a piece of coarse sandpaper on a sanding block (or just wrap it
around a wood block). Lay a glass pane flat on a table, with a sharp edge parallel to and
just hanging over the table edge. In a single downward motion, use the sanding block to dull
a portion of the freshly
cut pane. It will take a while to bevel every edge and corner of each pane, but it is worth it.
Otherwise your carnivorous plant pleasures will frequently result in blood loss.
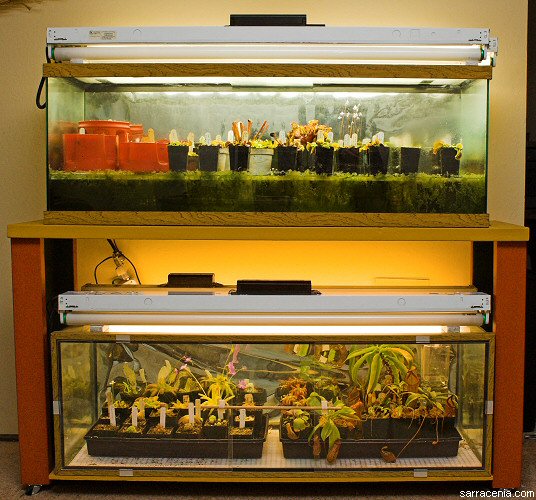
Double Terrarium
A side-mounted terrarium?
When I was working with my wife to make a terrarium so she could grow plants, we decided to build a stand
to hold two terraria, one over the other (see the terrarium to the right). My wife came up with the idea of mounting the bottom terrarium on its
side. Very clever! She just keeps her plants in trays in the terrarium, and it works out just great. She uses a set
of clips and a retaining rod to keep the panels in place.
Choosing fixtures
Because you have a 4' long terrarium, you can use 4' long fluorescent fixtures. These and
the bulbs they use are very inexpensive. Go to your local hardware, mega-hardware, or
discount store and look for "shop lights." You want fixtures that have two bulbs each.
I use basic T12 bulbs, not T8.
Some fixtures come with a clear plastic diffuser (which you will not use) that fits over the
bulbs. Others have large metal reflectors built into the case. The only restriction on size
is you should verify the fixtures are narrow enough you can place two next to
each other on top of the terrarium.
Buy bulbs too. Do not waste your cash buying expensive grow lights or full spectrum
lights. More than a decade of experience has demonstrated carnivorous plants do not need them. Just buy
inexpensive cool-white bulbs. (I use a mix of cool white and warm white
bulbs.) Only buy brand name bulbs like Sylvania or G.E. Cheap
house brand bulbs do not perform well---their light production rapidly decreases.
Do not buy 34W bulbs, get the full 40W bulbs.
An aside about LEDs
LED light sources (yeah that's something of a tautology) are very common in some hobbies--I think the aquarium trade, and maybe herpetology?
But they are being incorporated by carnivorous plant growers. LEDs supposedly have the benefits of being energy efficient, long-lived, easy to work with,
and since they are so energy efficient they don't produce a great deal of waste heat. Finally, they did not vote for Trump, either!
Unfortunately, no one has yet written a good treatment on using LEDs with carnivorous plants, so I don't know how many strips of lighting I would need
to replace my six-bulbs. If you are building a terrarium, I STRONGLY encourage you to try to research this. It's the wave of the future.
But let's get back to fluorescent bulbs.
A comment on ballasts
The cheap fluorescent fixtures are invariably equipped with cheap ballasts. The ballast is an essential component
of a fluorescent fixture, as it transforms the voltage that comes from you house to the high values needed to energize
the fluorescent bulbs. Until the late 1990s, the only kind of ballast you were likely to encounter were "magnetic"
ballasts. A newer technology came onto the market at that time, called "electronic" ballasts.
Electronic ballasts are a little smaller, and most importantly they consume (and waste) less heat. This means they are cheaper to
run, and if you use them you are less likely to overheat your terrarium. I have replaced all my ballasts with electronic ballasts, and I
encourage you to do the same. Unfortunately, electronic ballasts cost about $20 each. Make sure you get the right kind--for my
settings I get a single ballast for each pair of 40W T12 bulbs.
Electrical work I: optimising fixtures
You have two very nice shop lights, but they are not yet suitable for
your carnivorous plant terrarium. The purpose of the fixtures is to transform electrical
energy into radiation the plants can use---light! The plants want light of
specific wavelengths, all in the optical spectrum (colours that you can
see with your eyes). Sadly, fluorescent fixtures are not 100% efficient, so
some of the electricity is converted into heat. This is why lamps
become hot. The heat energy is released by the fixtures in two ways.
The first way is by conducting the energy into the air. The second way is
by radiating the heat at invisible infrared wavelengths. What you have to
do to make your fixtures terrarium-ready is modify them slightly so these
sources of waste energy can be removed before they heat your terrarium.
In this section I am going to assume you have the very basics of knowledge
regarding how to complete wiring projects. Specifically, I assume you know that
the three prongs of an outlet are for the ground, neutral (or common), and hot
lines. I assume you know how to make connections between two or more
wires using wire nuts and electrician's tape. I assume you know basic safety
practices like how not to electrocute yourself. If you do not know these things,
buy a basic wiring book which will cover these details in the first 20 pages.
Or you can pay an electrician to do the wiring work for you.
Disconnect the fixture from any source of electricity,
remove the bulbs (if you already installed them), and open the
metal fixture box. You will probably have to unscrew
a few screws or flip a few clips to do this. You should see something like this:
The ballast is the heavy black rectangular device which develops the extremely
high voltages needed to operate the fluorescent tubes, as I described a few sections ago.
Do not open the ballast
unless you intend to have it destroyed in the process. The ballast is the most
expensive part of the fixture. It is also what produces most of the unpleasant
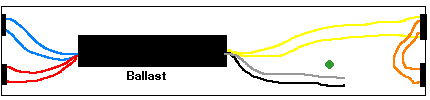
heat energy. Notice several wires extending from the ballast. They are variously
coloured but on all mine there is a pair of red ones, a pair of blue ones, a pair
of yellow ones, and one black and one white (rendered in my drawing as a grey
wire). The pairs of blue and red wires extend to a pair of lamp-sockets where
they clip into place. The pair of yellow wires (usually much longer) go to a
lamp-socket at the other end of the fixture. A short pair of black jumper wires
(I rendered in orange-brown) take these voltages to other lamp-socket. The
black and white wires are the hot and common lines, respectively. Since the
ballast is tightly screwed onto the fixture, the ballast and the
fixture are in electrical contact---you could imagine another wire
connecting them. In other words the ballast is grounded to the fixture.
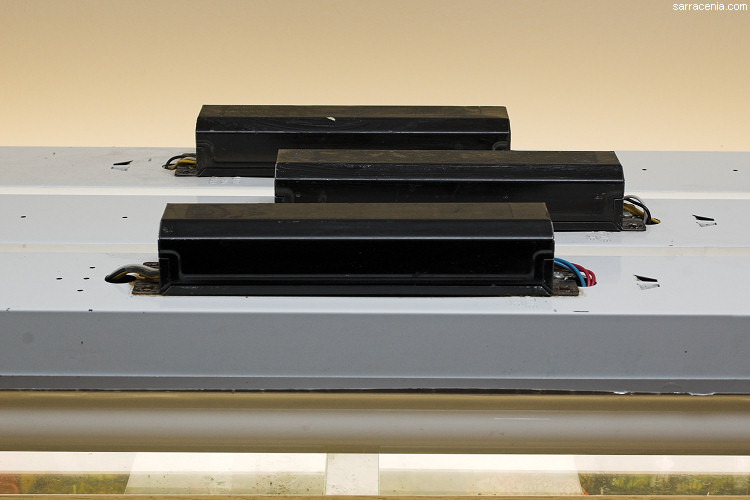
Ballasts
Your mission is to disconnect the ballast wires, remove the ballast, then
remount the ballast on the back of the fixture (or you may be
replacing magnetic ballasts with electronic ones). When the fixture is
operating, the ballast will no longer be in the metal box but will rather
besitting piggy-back
on it. (See the photograph to the right, showing
the black, externally mounted ballasts on the top of the fixtures.)
How will you do this? I can't tell you! The reason is that every ballast arrangement
is slightly different so you will have to use your own skills of ingenuity. But here are
some hints, suggestions, and reminders:
- Depending on the particulars, you may need a drill, wire nuts, electrician's tape, a wire-stripper, some assorted hardware (screws, nuts, bolts), and a screwdriver.
- It will take a while for you to remove the wires from the lamp-sockets. You will probably have to peel back the cardboard wire-covers on each to get sufficient access to each. Sometimes, if you are really unlucky, you'll discover that the lamp sockets are designed so you can't goof around with them as I suggest. In this case, you must return to the hardware store to buy replacement lamp sockets. Don't worry, they are inexpensive.
- You may have to drill some new holes into the fixture cover so you can attach the ballast onto the back of it. In no case should you drill holes into the ballast itself.
- Make sure the ballast is firmly attached to the fixture box. It should be grounded like this or the lights will not work properly. A continuity test comes in very handy at times like this.
- You may have to drill more holes into the fixture box to snake the wires back into it. Make sure sharp edges from this hole do not cut through the wire insulation.
- You may find that despite your most cunning plans you will have to add some lengths of wire to the inside. If so, use wire-nut connectors, electrician's tape, and copper wire no thinner than 14 gauge. I use 12 gauge. Make all connections inside the metal fixture case.
- Later you will want to attach a grounding wire to the fixture. You might as well drill a hole into the fixture cover now for the grounding screw, if a hole for that purpose doesn't already exist.
- If you really goof up on these steps, rest assured you can buy replacement parts for any part of a fixture at a large hardware store.
- This part of terrarium-construction is the most irritating. But it is important.
Finally, you will have to make the electrical connections for the hot, common, and ground lines. The most simple way to do it involves a few feet of electrical cord, a male plug, and a few wire nuts. Good wire would be "stranded 12 gauge wire with a hot, common, and ground." Attach the male plug (make sure it is three pronged) to the three wires in the cord. Thread it through a hole in the fixture (probably via a "knockout" in the fixture box). If you don't have a "strain-relief" for the knockout, tie a loose square-knot in the wire so if you pull on the plug the knot stops the wire from being drawn so far out of the fixture that your electrical connections are strained. Using wire nuts, connect the cord to the hot and common lines of the ballast. Finally, attach the ground line of the power cord to the grounding screw you drilled into the fixture. After this, you should have something that looks like the following figure (where I have drawn the ballast, now on the other side of the metal panel, as an empty rectangle but the wires have entered the box through holes you drilled, the green line is the ground line, and wire nuts are indicated by little grey plugs):

You may decide to make things a little more complicated, like have a second power cord come out of the fixture, and attach a female connector to the end. This way you could plug the fan or a second fixture into this one. A fan usually doesn't need to be grounded, but a fixture must. In this arrangement you will have something like this:

In any event, you are nearly done with the fixtures (you hope). Close them, reinstall the
bulbs, and then turn them on to see if they work. If you did something wrong you
will probably blow a fuse. Or maybe your house will catch fire. In any event, this
first test is always an exciting moment.
At auto stores you can purchase
chrome auto tape for several dollars. Tape this on the underside of the fixture for
greatly enhanced light output.
A cooling fan
Even after all the work you did with the fluorescent fixtures, they still will produce heat that
will yield conditions too hot and humid for many carnivorous plants. I have found an ideal solution
is to install a small fan. These fans cost approximately $10 and are available in electronic stores
that cater to people that build and repair computers. Make sure you purchase one that operates
on normal line voltages (115Volts, AC) or else you will have to buy a transformer too. A good brand
name is TOYO---at least it has never failed for me. I usually select ones that blow about
25--35 cfm (that is in units of cubic feet per minute). These are small,
only about 3" square and 1" deep. They produce little noise other than the sound of air blowing.
Power cords are also available for about $5. When the
terrarium is ready, you will want to position the fan in some way to blow across the terrarium
lid. This will remove most of the heat generated by the ballasts and the terrarium will be
much better as a result. Experiment with the fan placement. Sometimes the fan may sit on the lid
and make a loud, irritating rattling sound. A change of just a few millimeters may silence this
problem completely.
If you do not use a fan you may find your terrarium walls become covered with
condensation inside, preventing you from seeing in. This is because
the terrarium has gotten very hot inside. The hot, humid air inside
the terrarium loses its water when it contacts the cooler terrarium walls, and
the condensation collects on the glass walls to annoy you. Consider condensation on the terrarium an
indication that something is wrong with your cooling system.
A timer
You will rapidly tire of turning your terrarium lights on and off every day, so you should buy
an electric timer. Electric timers cost about $10--15, depending upon the features you
desire. Every timer I have ever bought was reliable, so just
find one you like. Now you can go
on vacations, your plants will be fine, and it will look like someone is home during
the day!
Electrical work II: making connections
You must make one final foray into the world of electrical modifications. This is because every
timer I have ever seen is polarized but not grounded, and your lights must be grounded. So you
must buy one of those converter plugs that has a ground on one side, but only a flange on
the other. Plug the ungrounded timer into this adapter, then plug the adapter into the wall.
Run a ground line from the flange, around the timer, and into your lamps. I find the best way to
to this is make a special extension cord out of three conductor wire, and have the ground wire pop
out of the wire, like this:

Once you have that ready, you can install the timer into your system:

It is a good thing to add the power consumptions of your fluorescent fixtures together to make sure
they don't exceed the rating of your timer. The power consumption of the fan is negligible.
Once you have done all this, you can send power to your lights! You may need an adapter to
provide enough outlets for your fixtures and fan, depending upon if you decided to
wire them with extra plugs dangling out or not.
Final arrangements
Congratulations. The construction is now complete. All you must do is assemble your individual
components and arrange everything neatly. Make sure all the electrical connections are located
inside fixtures,
and that any place two plugs connect will not get water splashed on it. Check that the timer
dial is free to rotate. Incidentally, although those timers seem quiet, if you place them on an
appropriately resonant surface you can hear them ticking at night. This may be irritating.
How are you going to hold the lamps over the terrarium? Don't place the bulbs in contact with the
lid---that will impede air-flow from the fan and will also provide a thermal link that will really heat
the terrarium. I usually lay a few small lengths of
1" × 1 " wood across the terrarium and rest the bulbs on
those. If you have the building block
toys called Legos, those are wonderful for assembling into small light-spacers.
They have a melting point far in excess of what you will encounter with your terrarium (I know, I once
read a Smithsonian magazine article all about Legos). Position the fan so it blows across the
length of the top of the terrarium, and especially across those ballasts.
Finally, make sure you arrange everything so access to the terrarium contents
is as convenient as possible. Furthermore,
keep an eye on hiding extra wires and other unsightly items. Take
some pride in this most excellent terrarium! Some people, mostly guys, find the word
terrarium a bit un-testosterony. If so, call it a growth tank or a
bio-chamber. Whatever! It looks great!
Planting arrangements
A point of controversy and ultimately personal preference is how you may want to grow
the plants in the terrarium. Do you want to fill the entire terrarium with a layer of sphagnum
and then plant your specimens in your miniature wetland? This can produce very nice results.
Unfortunately, it is difficult to take the plants out to clean or propagate them. Furthermore,
invasive species like any Utricularia will cause problems. Another approach is to grow plants
in pots, sitting in the terrarium. I prefer this because I grow so many species a community
planting is out of the question. It also requires less soil and makes it easy for me to remove
a single plant for propagation. You may consider a hybrid approach I once tried. Mimic the effect
of a community planting, but keep the plants in their pots (which are set in depressions in the
Sphagnum bed). I finally discarded this method because I spent too much time trying to hide
to pot rims and also the impetuous Utricularia kept escaping into the community planting.
If you opt for growing the plants in pots, you should place a layer of egg crate or gravel under the
pots so if the water table drops too low you still have several days in which water is still in the
terrarium keeping the plants moist via humidity. I much prefer eggcrate (which is a white
plastic lattice kept near fluorescent fixtures in hardware stores) because it is lighter and easily
cleaned. By breaking the eggcrate squares, you can easily make just the size you need for your
terrarium. If you use gravel, it must be washed thoroughly before use---it might have been harvested
from the sea, in which case it would contain salt.
However you arrange your plants, wash the terrarium interior one final time to remove any
noxious compounds that may have accumulated.
Situating the terrarium in your home
Finished! Can you believe it? Now you must decide where you are going
to put it. If you have spent some time and care, it should be fairly attractive and you might
want it in your living room. If it is not so lovely, a back room might be better. Remember this
will produce some heat, so if you relegate it to a room with poor circulation both it and and room
will become unpleasantly warm. Do not place it somewhere the sun can shine directly upon
it. My wife likes carnivorous plants, so we have three terraria in our place, but not everyone
would be so forgiving. Make appropriate choices between keeping both the terrarium and
everyone's tempers cool.
Frills
When I assemble a new terrarium, I follow the steps I described to make a minimal arrangement.
Then, since I am occasionally interested in woodwork as a hobby, I usually spend some time trying to
improve the appearance of the terrarium. I suggest you experiment with making a box to fit over the
top of the terrarium to hide the fixtures and wiring (which frankly are not particularly pleasant to
gaze upon).
Also I have not discussed making a terrarium stand but
I may soon post some easy designs describing
how to make one. Think of ways to beautify your growing situation to show your plants off to
their best! A trip to the aquarium store to gaze upon their high-end models may give you some
ideas on how to make some equivalent cabinetry at a fraction of the cost.
Until then, some cinder blocks and a wooden board will be just fine.
Maintaining the terrarium

Bubbler
Once your terrarium is assembled, it will require little care. You will find if the terrarium is completely
sealed it will just need to be watered once every few or even several weeks. Adjusting the lid panes
to allow some air circulation may be beneficial, or maybe not. It all depends upon the exact
particulars of your situation. Experiment. It is useful to buy a quality thermometer to keep track
of the conditions in your terrarium. Also, consider adding a terrarium bubbler, which I describe in the main part
of the cultivation section in the FAQ.
In this article I have emphasized trying to control the temperature of your terrarium
because heat, along with providing sufficient light,
is the biggest hurdle for you to overcome. That is why a fan is so important. If you have arranged
your terrarium but are disheartened because water condensation prevents you from seeing the
contents it is because you are not using a fan correctly. A big room fan occasionally blowing
over the terrarium may not do as good a job as a small, carefully placed computer fan.
Costs and tools
The last time I priced out a terrarium was in, like, 2007! And this is what I found then. Now--things might be more. If you opted for LEDs, it
might easiy double your total cost...
Glass tank: $125
Timer: $15
Reflective backing: $25
Egg crate: $8
Glass pans: $20
12g wire: $5
Fixtures: $45
Assorted electrical: $15
Fluorescent bulbs: $12
Miscellaneous hardware: $10
Fan and cord: $15
Electronic ballasts (optional): $40
The Bottom Line: $295-335
Equipment you will need:
Scissors
Electrician's tape
Coarse sandpaper on a block
Drill
Screwdriver
Wire-strippers
Glass cutter (optional)
Page citations: Rice, B.A. 2006a; personal observations; reader contributions.