From the FAQ Library:
Building a Darlingtonia cooling box
Conventional wisdom says that Darlingtonia plants do best if their roots are kept cool, and can
survive in even toasty conditions if this criterion is met. Perhaps this is true. So to try to keep
Darlingtonia roots cool, some horticulturists
(especially those in Japan) have told me about special boxes they use to chill the roots of their
plants. I have never tried building one of these myself, but below is a description on how to make one. I present a method that a
slight variation on the ones I have seen, as it incorporates a few improvements. I must try to make one of these to see if they
really work!
The basic concept: evaporative cooling
The Darlingtonia box works on the idea that evaporative cooling on the lateral surface of the pot is maximized,
so the potting medium is cooled as much
as possible. The box shields the pot from sunlight (which heats the pot), yet keeps the pot sitting in enough water to keep it moist.
It also allows for flowing air, to maximise evaporation.
The pot
For this method to be effective, the pot must be porous ceramic. Glazed ceramic or plastic pots do not allow evaporation, and would defeat the
entire mechanism. The pot should be deep enough to house a mature plant, i.e. at least 30 cm deep. While the plant can be potted in whatever
medium you prefer, a top dressing of white perlite or pumice may help reflect incident sunlight, and thus decrease heating.
The tray
The box should sit in an undrained tray--this tray should be about 5 cm deep. Its exact dimensions will depend upon the box you build.
The tray should be white, to avoid being heated by sunlight striking it.
The box
This is where things start becoming creative. You must find a white plastic box that you can easily modify via drilling, cutting, etc.
The best solution seems to be a white styrofoam box, the kind that is used to make cheap picnic coolers. You know--the sort that are so
fragile you can punch holes in them or break them over your head. (All very gratifying, by the way.) You do not need the lid. The box must be
large enough so you can cut a round hole in the bottom which is as big as the top of your pot, with about
a finger thickness to spare all the way around. Cut such a hole in the box.
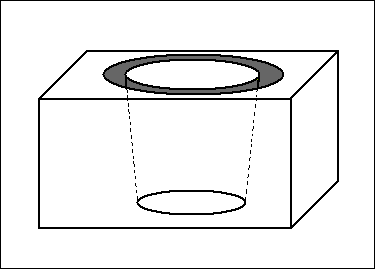
Now, turn the box over and drop the pot into the hole. The box must also be
large enough so the bottom of the box (now the top) is more or less level
with the top of your pot. (see Figure 1).

Figure 1--inverted cooling box and the pot it hides
Cooling fan
Next you will need a cooling fan. In the
FAQ document on building terraria, I describe small cooling fans of the sort that are used in
computers and other equipment. You will be using this fan outside and around water, so for heaven's sake
make sure that your wiring is done safely with a fuse in the circuit, that the fan is ultimately shielded from the elements,
and so on. If you don't understand why I am concerned, do not attempt this project!
Perhaps the most elegant solution
to this would be to use a solarpowered fan (I've seen these in electronic supply houses, or stores that stock educational
science kits). This is an interesting puzzle, and I'd like to hear better solutions. A car battery? Nah...
Cut a hole in the side of the box, so the fan can blow air into the side of the box. Where will the air escape? Why, out of the gap ringing
the pot at the hole in the top of the box, of course!
How to assemble the parts--poorly
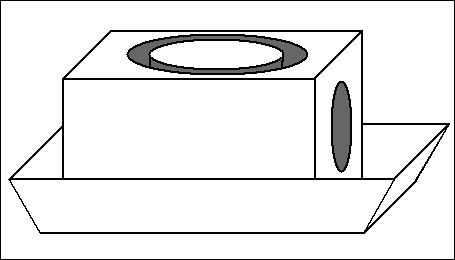
Here is a first stab at assembling the Darlingtonia box, but a way that is quite inefficent. Invert
the box and drop it into the water tray. Drop the plant into the box hole. Add a few inches of purified water into the tray, install
the fan into the portal in the side of the box, and power it up! (Figure 2)

Figure 2--cartoon fan not drawn in, but side hole is shown.
Air will be blown into box, and then exit through the empty spacing in the roof of the box, that encircles the pot. As it
moves along this path, the air will encourage evaporation in the reservoir, and on the pot surface. This evaporative cooling will chill the pot
and the water. Just how much of a chilling effect will vary; if you live in a very humid environment, the air will be quite turgid with water
and unable to pick up more, so the method will have little effect. If you live in a relatively dry climate, the effect will be much more
useful.
This is not as efficient as it could be, however. Much of the evaporation occurs in the water tray, which is really not very important. You want
all the cooling to occur on the pot...here's how to improve things...
Adding a pot skirt
Cut a big rectangle out of sturdy plastic film. (Go to a hardware store and look for plastic sheet at least "4 mils" thick.) The
dimensions of the rectangle will depend upon the size of your Darlingtonia cooling box.
Cut a circular hole into this sheet big enough to accomodate the pot.
Here is the tricky part. You want the plastic sheet to float, inside the cooling box, on top of the water surface. That way it does not permit
the water inside the box to evaporate. Only the water on the outside of the pot can evaporate, and this improves the efficiency of the cooling.
Perhaps some twine would be required to keep the sheet attached to the pot, and how would you keep the sheet from sinking? Little floats
underneath? Or would you attach the sheet to the inside wall of the box? An interesting design problem.
Does this really work?
Several years ago I was sent photographs of this set up in action, and the letter-writer (who I have since forgotten, to my great
embarrassment) assured me it was very effective. The system will take some tinkering to optimize, I think.
I could imagine that too much airflow would dry
out the pot surface completely, thus shutting down the cooling system. Also I could imagine that despite the complicated protocol, it might
just not work for some other reason. But the letter-writer was quite enthusiastic, I recall...
Page citations: Personal observations; reader contributions.